
The cam chain tensioner is a hidden – yet critical – part of your bike engine. It keeps proper tension in the cam or timing chain, connecting the engine crankshaft to a camshaft.
This ensures smooth synchrony of pistons and valves – keeping the engine operating in harmony.
It will eventually fail with prolonged wear and tear, so you need a Harley cam chain tensioner upgrade.
It can’t just be cleaned and reused, so a complete replacement, together with the timing chain, is necessary.
Contents
- 1 How Do you Know your Harley Cam Chain Tensioner Needs Replacement?
- 2 Engine Rattling Noise
- 3 Harley Cam Chain Tensioner Upgrade
- 4 Tools Needed
- 5 Special Tool
- 6 MBS Manufacturing CTUTC8-D15 Tensioner Unloader
- 7 How to Select Cam Chain Tensioner
- 8 Pressure Mechanism
- 9 Housing
- 10 Shoes
- 11 Harley Cam Chain Tensioner Replacement
- 12 1. Removing External Bike Pieces
- 13 2. Careful Sequencing
- 14 3. Replacing the Tensioner
- 15 4. Gentle swapping
- 16 5. Finish the installation
- 17 Harley Davidson Cam Chain Tensioner Replacement Cost
- 18 Cost of DIY Installation
- 19 Cost of Professional Installation
- 20 Frequently Asked Questions (FAQs) of Harley Cam Chain Tensioner
- 21 Is it possible to just replace the cam chain tensioner shoe?
- 22 How do I avoid this cam chain tensioner from wearing out quickly?
- 23 Can I replace the timing chain alone?
- 24 Can the bike be placed on its side to perform this installation?
- 25 Conclusion
How Do you Know your Harley Cam Chain Tensioner Needs Replacement?
While a bit tricky to know right away, a few things will give you a better idea of what’s happening.
If your bike suffers from any of these, there’s a chance it has a bad cam chain tensioner:
Engine Rattling Noise
Caused by slackened timing chain skipping or ‘slapping’ on fast-rotating gear teeth. The rattling sound is loud when the engine starts, then get softer or fade away slowly.
“Check Engine” Light Alert
The onboard computer software warns when engine performance falls below tolerance levels. With the cam chain tensioner failing, the loosened timing chain contributes to engine power loss.
Engine Misfires
Caused by skipped gears, the cam chain tensioner can no longer trim all slack in the timing chain.
Engine Won’t Start
The crankshaft and camshaft are no longer kept in sync by the stretched timing chain.
Metal shavings
Rough contact with gear teeth ‘shaves’ metal slivers off the loose timing chain. These can be found in engine oil and filter during routine servicing.
Engine Seizes Up
This is the worst-case situation. Pistons and valves rhythms are no longer aligned. Major engine damage is about to or had already occurred because the cam chain tensioner has failed.
As a result, the timing chain is too loose and the engine doesn’t keep up.
Harley Cam Chain Tensioner Upgrade
It may seem daunting to take on a DIY Harley cam chain tensioner upgrade. But the good news is many others have handled this on their own by following the instruction manual closely.
This is a significant task that will require at least 5-6 hours to complete, so it’s best to have some readily accessed liquids and snacks handy.
Have a lot of free space available around the bike for easy reach.
Tools Needed
Before starting on the Harley cam chain tensioner replacement, here are some of the tools needed:
- Screwdrivers: battery-powered if possible, plus ordinary flathead ones for hard-to-reach spots.
- Wrenches: to unscrew nuts/bolts, it could be better if a powered wrench is also available.
- Allen key set: for undoing & refastening necessary screws
- Spray-on lubricant: to remove grease and rust for easier unscrewing or removal of nuts/bolts
- Oil pan: to collect dripping engine oil
- 4 strong straps: bike needs to be secured to avoid falling over, front-wheel chock optional
- Rags and clean cloth with a pair of scissors
- Colored duct tape + marker pen: to mark key fit/mounting locations
- Blasting rock music: to zone out distractions, unless silence is preferred.
Special Tool
The Harley Davidson cam chain tensioner upgrade kit lacks one very essential tool – called the tensioner unloader.
This tool basically releases the pent-up tension in the timing chain to be removed and replaced with the cam chain tensioner.
A good tool is the:
MBS Manufacturing CTUTC8-D15 Tensioner Unloader

Machined from a solid steel block rather than cast – for extra strength and durability.
It comes with two pins, which need to be appropriately inserted to unload pressure off-chain tensioners in turn.
First the primary, then secondary – enabling the disassembling of the camshafts and later assembly.
This tension unloader can be reused for years as it has a black oxide finish to prevent corrosion.
It’s an affordable tool that can be shared with friends who also have Harley cam chain tensioner problems.
How to Select Cam Chain Tensioner
There are basically three parts that make up a cam chain tensioner – the shoe applied to the chain, the housing, and the mechanism applying even pressure.
Pressure Mechanism
How the pressure is applied depends on the design – it can either spring-loaded or hydraulic fluid.
Either works and how long each lasts depend more on the housing and shoe than on this key portion of the cam chain tensioner.
While the spring maintains steady pressure, the hydraulic fluid push can vary according to cam chain RPMs – rising for higher RPMs.
Housing
The housing is typically made of steel to be sturdy and ensure it stays in place once fitted properly.
Steel screws are used as fasteners, typically with sunken hexagonal grooves needing the Allen key to tighten or loosen.
Shoes
As the part in constant contact with the cam chain, the shoe has to be challenging yet stay smooth over thousands of usage hours to avoid abrasion.
This can wear out the cam chain links or cause metal slivers to be ‘shaved’ off.
Some of these shoes are metal-based, with grease acting as the lubricant.
This grease can turn into sludge over prolonged usage and exposure to the high heat generated, losing its lubing properties.
Newer shoes are made of injection-molded nylon with PTFE (the substance used for Teflon coatings) to withstand wear and friction.
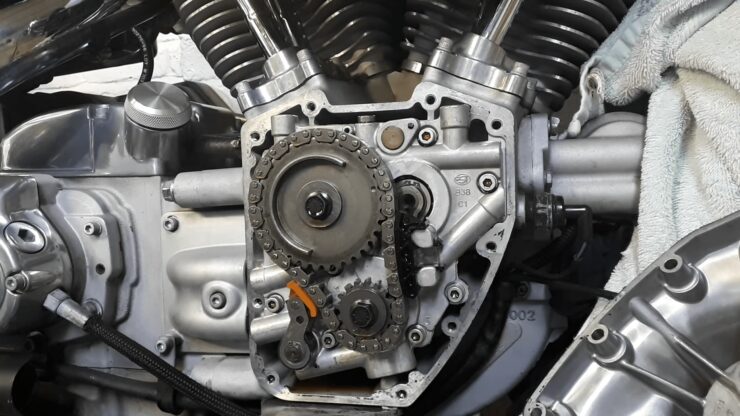
Harley Cam Chain Tensioner Replacement
Performing the Harley cam chain tensioner upgrade involves three main stages.
Before starting, make sure the motorcycle is fully immobilized with everything switched off and the starter key put away.
The kickstand support alone won’t be enough – strap the bike down firmly as if it’s about to be transported on a trailer.
1. Removing External Bike Pieces
As a sensitive piece of equipment, the cam chain tensioner is located quite deep in protective housing, next to the bike engine.
This means some outer bike pieces need to be removed first to gain access.
It’s advisable to place these bike parts in the order they are taken off – with the earliest part removed and put further away – so the reverse refit sequence is done right.
This also includes screws, nuts/bolts, washers, and any other piece – to avoid later headaches.
2. Careful Sequencing
For the Harley Davidson motorbike, pieces that need removing first would be the floorboard and the exhaust system. Look through the bike manual on how this can be done:
- There are a few nuts/bolts which need to be loosened before these pieces can be removed. Clean off any mud or dirt for better grip using the right-sized wrenches.
- If the nut/bolts are rusted tight, use the spray-on lubricant and wait a few minutes before trying to loosen them.
- Once the nuts/bolts are off, together with washers, number each with pieces of colored duct tape using the marker pen as a reminder.
- Matching number duct tape can also be stuck onto where these parts should be returned later.
- Lastly, gently tug off the brackets. Don’t pull out completely – check if there are any sensor cables or sockets which also need to be unplugged.
- Once all these have been safely unplugged, you can remove the bracket entirely off the bike.
You can watch this video here to know how it’s done;
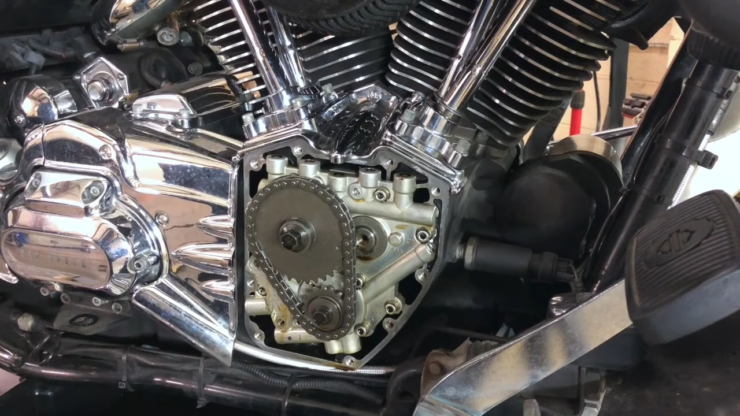
3. Replacing the Tensioner
To access the tensioner, the cam covers need to be removed. This requires the right-sized Allen key – loosen first to avoid warping the cam casing, then remove the bottom screws before the top.
Here’s where the oil pan is needed to collect dripping engine oil.
4. Gentle swapping
The special unloader device needs to be slotted in now gently to remove the tension of the cam chain against the tensioner.
Follow the provided instructions, including how to slot the accompanying pin into a hole on the cam plate:
- Use the flathead screwdriver to lift the cam chain slightly off the tensioner. Don’t use force – to avoid stretching this chain.
- This should leave just enough remove to slide out the old tensioner.
- Don’t let the chain snap back to avoid getting damaged or worse – cutting off a finger!
- Following the instruction manual, slide out the old tensioner and slip in the replacement.
- Fasten into place, then gently lower the cam chain by sliding out the flathead screwdriver.
- After removing the unloader device, slowly twirl the cam chain to check if it’s flowing smoothly with the gear teeth.
- Replace the cam covers and use the Allen key to screw it back into place.
You can watch this video how to do this task right
5. Finish the installation
Before fitting back the external bike pieces, plug your ears and turn on the bike to see if the engine runs smoothly.
If there’s no more rattling or the ‘Check Engine’ alert doesn’t light up, the cam chain tensioner has been fitted correctly.
Turn off the engine, wait for it to cool, then fit back the external bike parts in the reverse order of how they were removed.
Remember to also take off all the colored duct tape pieces and check if the engine oil needs to be topped up.
Harley Davidson Cam Chain Tensioner Replacement Cost
Cost of DIY Installation
Assuming only the cam or timing chain tensioner is being replaced, the overall cost should be less than US$250.
This includes buying a Harley Davidson cam chain tensioner upgrade kit, plus maybe a little extra for straps used to immobilize the bike.
Extra costs may extend to the Allen key set, wrenches, screwdrivers, and other parts obtained if not already available.
Cost of Professional Installation
If this is done professionally at a workshop, this Harley Davidson twin cam 88 cam chain tensioner upgrade cost can be upward of US$2,000 – depending on where the work is done.
The most significant chunk of this cost is the skilled labor expense. It takes 5-6 hours to complete the whole task of removing, installing and replacing all the bike parts. So there would be clear savings in a DIY job.
Sadly, it is rare to just replace this one item. Chances are the cam or timing chain usually needs replacing too.
Hence, jacking up the overall Harley Davidson cam chain tensioner replacement cost. If the gear teeth are showing signs of wear, their replacement will further raise the upgrade bill.
Frequently Asked Questions (FAQs) of Harley Cam Chain Tensioner
Is it possible to just replace the cam chain tensioner shoe?
It depends on the original device. Since it’s such a critical component and so much effort goes into replacing it on the bike, it makes more sense to fit in a complete device rather than just a component part.
There’s minimal cost saving with shoe replacement only.
How do I avoid this cam chain tensioner from wearing out quickly?
Servicing the bike with engine oil and filter changes at manufacturer-recommended intervals can help.
But it all boils down to mechanical wear, which can be checked only by visual inspection after removing the cam cover. So, there’s no real way to do so.
Can I replace the timing chain alone?
In most situations, the timing chain needs replacing only after the cam chain tensioner has failed.
If the latter device still works fine, there’s rarely a situation where the timing chain has to be changed.
Can the bike be placed on its side to perform this installation?
No. The bike is ridden vertically, fitting in this critical part while the bike horizontal may result in an improper fitting.
Also, other damage can be caused by laying this heavy bike on its side.
Conclusion
As Harley Davidson bikes can last for many years, many choose to get used bikes instead of buying new ones.
But for that, they’ll need to do a Harley cam chain tensioner upgrade sooner or later.
It is the most critical part needing a replacement for used bikes – apart from dents, some other worn-out parts, or just needing a paint job.
It’s a really cost-effective way to own a Harley compared to a new bike cost.